Blogging with Quarto 📓
Learn how to work with Quarto, and create and publish a blog created in RStudio
“[…] there is growing evidence documenting the prevalence of publication bias in economics and other scientific fields, as well as specification searching, and widespread inability to replicate empirical findings.”
– Christensen & Miguel (2018)
In this first lesson you will build and publish a blog online for free using Quarto and Netlify.
Level: Beginner · Time: ~45 min · Prerequisites: None · Tools: Quarto, RStudio, Netlify
You will learn to
- Tell a Quarto website apart from a Quarto blog, and pick the right one for a given project.
- Create a Quarto blog project in RStudio and preview it locally.
- Control site-wide configuration through
_quarto.yml. - Publish the rendered site online for free with Netlify.
- Annotate and discuss the published site with Hypothesis.
Your blog online for free
You are lucky.
Quarto is the publishing system this whole site is built with, and now you’ll learn how to build one for yourself and publish it online for free. It goes beyond R – it also handles Python, Julia and other languages – and it keeps gaining new ways to publish content online.
A Quarto website and a Quarto blog are the same underlying project type, type: website, with one difference: a blog adds a listing on its home page that automatically shows your posts newest-first, with dates and images. If you don’t need that – say, a documentation site or a personal site with a handful of static pages – a plain Quarto website skips the listing machinery entirely. This lesson builds a blog, since you’ll be publishing dated practice posts throughout the workshop.
Let’s build a blog-type website from scratch and publish it. Following every step below, including creating your Netlify and Hypothesis accounts, realistically takes 30-45 minutes the first time – budget for that rather than the “five minutes” a bare render-and-deploy would take once everything is already set up.
Step 1: Download and install Quarto, and create a Quarto Website Project from RStudio
Open the Quarto get-started guide to download Quarto and install it in your computer. Then open RStudio and create New Project. You see a few new options. Select Quarto Blog:
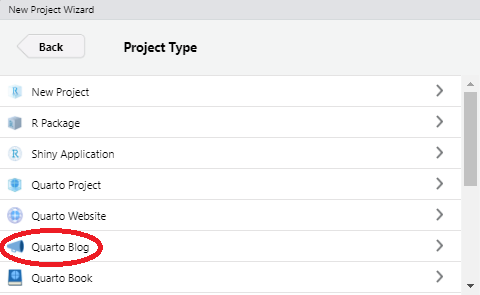
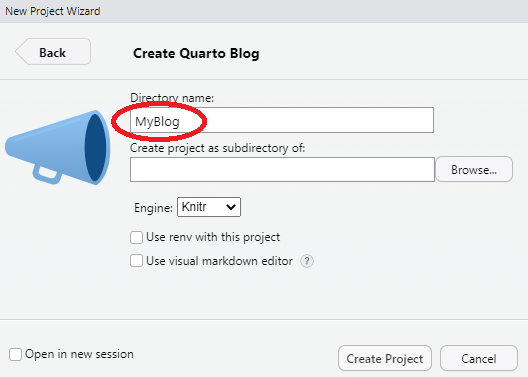
Build the website as an RStudio Project
Step 2: YML the details and the face of the blog
By creating the website as a Quarto Blog project, a few files will be created automatically in the folder you chose. The most important files are the _quarto.yml file, which is the configuration file for the whole website (note the leading underscore – a plain quarto.yml without it is not read by Quarto), and the index.qmd, which organises the default page of the blog.
In the _quarto.yml YML file you can include myriad options –from the title, logo, search box, header, footer, side bars, navigation bars, everything. In this file you will also format the output, which in this case is an HTML and you can include, just like in Shiny apps, Bootswatch themes, change fonts, colors, anything you want. This is also where the site’s output-dir lives: it names the folder your render actually writes to (Quarto’s own default is _site; this very R4DEV site sets it to _blog) – check yours before deploying, since it’s whatever folder you deploy, not a fixed name. Quarto is very versatile.
In the index.qmd file you basically design how the opening page of the blog will look like, what goes where and information on the author. The key option here is the Listings so you can define how each blog post appears in the blog, and define the folder name where you will store all blog posts –conveniently called posts. You can add buttons to sort the posts or filter them.
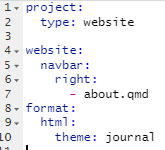
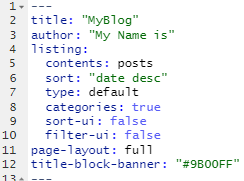
YML and index files in your blog
Indentation order, and the space between options, is really important in YML documents.
Step 3: Build one blog post at a time
Notice that in the index Quarto document the listings include the folder posts that is already in your blog folder. Each entry of the blog should be a folder within posts with whatever you want to include, and the listings will include them in the opening page of the blog in the order you choose.
bslib
One of the best customisation features for Quarto. With a few parameters you can completely change the look of a website, including colors, fonts and more. You can also use preexisting bootswatch themes
A Quarto document only shows up in the blog listing if it’s covered by the listing’s contents setting in index.qmd – by default that’s every subfolder of posts, which is why simply adding a new post folder there is enough, but nothing is included automatically just for existing somewhere in the project. In this case we’ll create a post for every practice you’ll do in this workshop.
Step 4: Render to HTML
Now you can build your blog by opening the index.qmd document and clicking the “Render” button  or typing in the console
 quarto::quarto_render(). A new folder with all the HTML files and supporting configuration files will be built in the Quarto Blog project folder.
I’ve created two posts for each practice assignment from this workshop, added some images for each one, and here is the result:
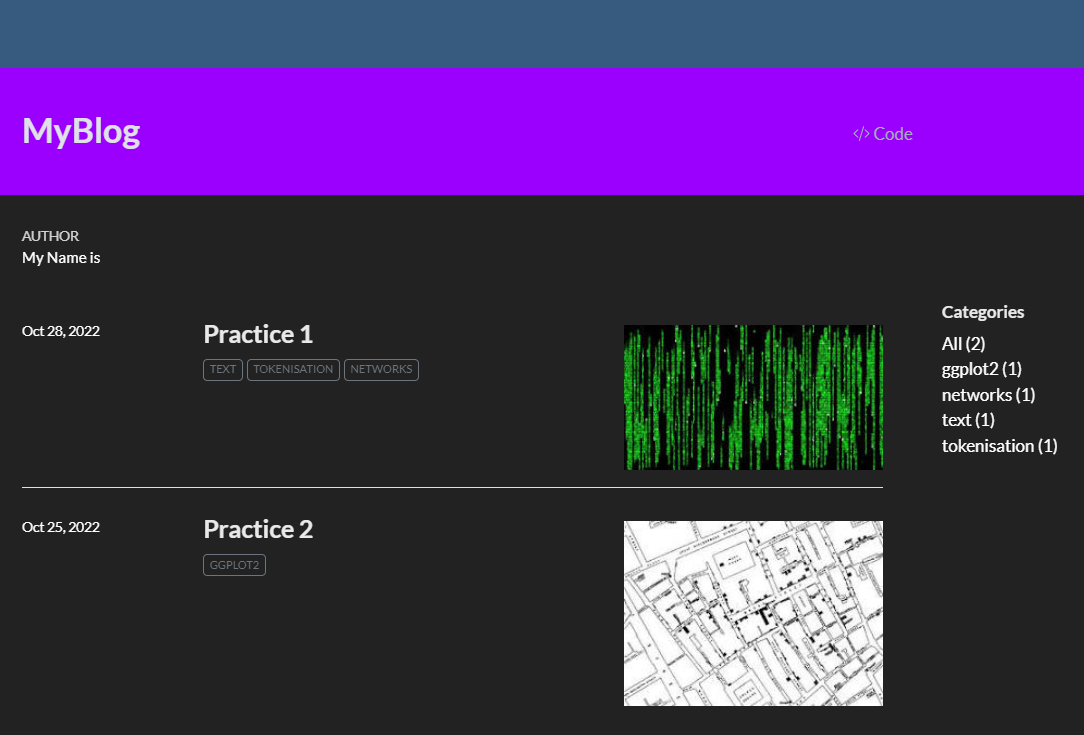
Commenting for the workshop is enabled using Hypothesis.
In the upper-right corner of each page there is a small menu you can click, and once you have registered with username-password, you can Annotate, Highlight or comment different parts of the site.
If you find errors, or things that need to be clarified, please signal them.
Step 5: Deploy to Netlify
There is more than one way to get a rendered site onto Netlify – here is the simplest one, plus a better one for the long run.
Option A – manual drag-and-drop (simplest, good for a one-off). Go to your new Netlify account, “Add a new site”, choose “Deploy manually”, and drag and drop the rendered output folder – the one named by your project’s output-dir (Step 2), _site by default – where indicated. In a minute or so the blog should be live.
Change the website name in “Site settings” to something like myblog-r4dev-practice.netlify.app and voila.
Manual drag-and-drop means re-uploading by hand every time you change the blog. If your project is on GitHub (or GitLab/Bitbucket), Netlify can instead watch that repository and rebuild the site automatically on every push: connect the repo from “Add a new site” → “Import an existing project”, and point the build settings at your output-dir. From then on, git push is your entire publishing workflow. The full walkthrough, including the quarto publish netlify command that does this from the command line, is in the Quarto Netlify publishing guide.
Bookmark the Quarto Guide and Quarto References, you’ll need them both.
🏗 Practice 1: Create a Quarto blog
This is the first Practice, and it builds the home for all the others: you’ll publish every session’s practice exercises in the blog you create here.
- Choose and apply a base Bootswatch theme for your blog
- Enable Hypothesis commenting in your blog by adding
comments: hypothesis: truein the YML (remember indentation!). Then create a group in Hypothesis with your name and share the link with me, so I can comment your site and provide suggestions. - In your YML under the
htmloption, includecode-tools: true
Your YML file should look like this, in this case, using a Bootswatch theme called journal:
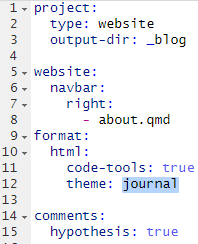
_quarto.yml with the journal Bootswatch theme, Hypothesis comments enabled, and code-tools turned onKey takeaways
- A Quarto website and a Quarto blog are the same engine with a different project template – a blog just adds a listing page and post-dated entries by convention.
_quarto.ymlis where the whole site is configured: navigation, theme, output directory, and more.- Whether a page shows up in a listing depends on the listing’s own configuration, not on the page simply existing.
- Manual drag-and-drop to Netlify is the simplest way to publish, but it isn’t the only one – a Git-connected deploy updates automatically on every push.
- Hypothesis annotation turns any published page into a place for feedback and discussion.
Citation
@online{amaya2022,
  author = {Amaya, Nelson},
  title = {Blogging with {Quarto} 📓},
  date = {2022-07-30},
  url = {https://r4dev.netlify.app/sessions_workshop/01-quarto/01-quarto},
  langid = {en}
}